

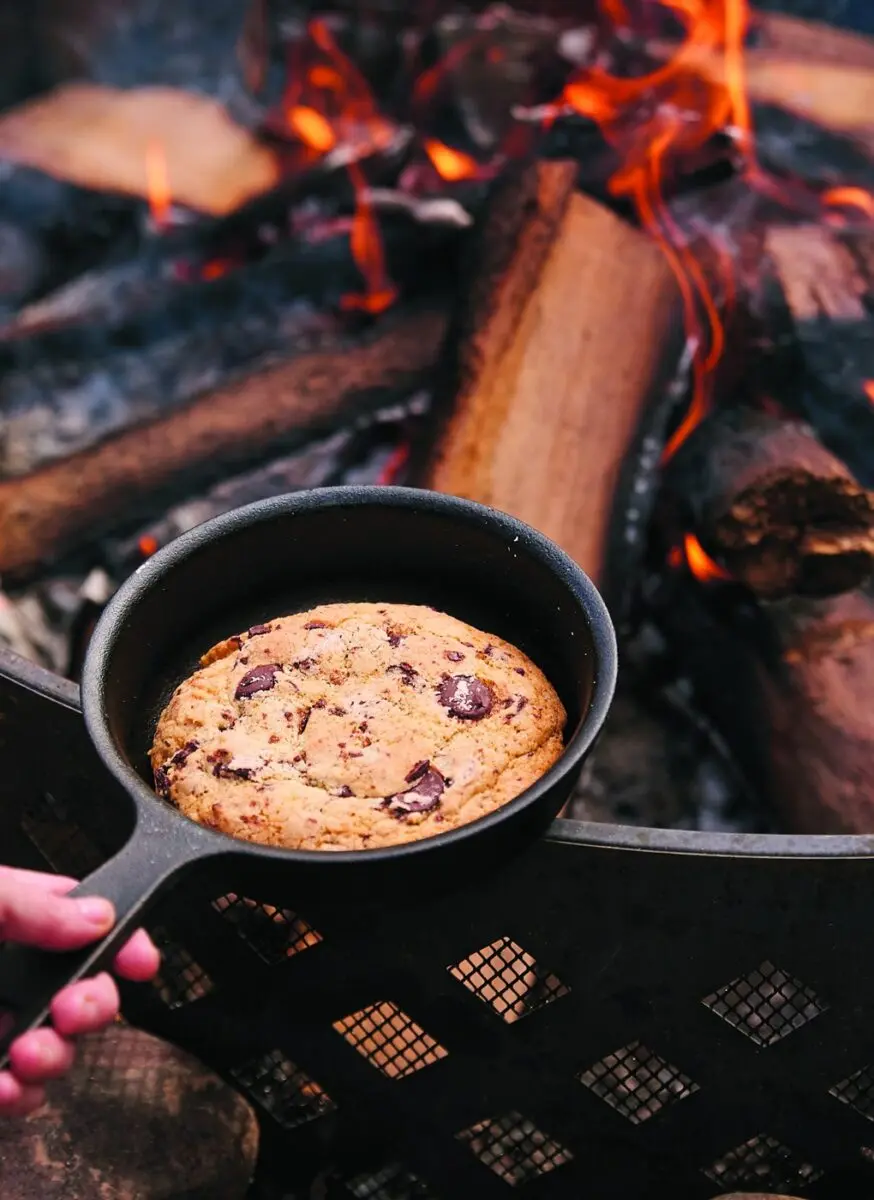
There’s a particular kind of joy in pulling a golden, gooey, ten-inch cookie out of the coals and cutting it into wedges while everyone around the fire watches. This isn’t a treat you slice thin and pass around politely — it’s a whole skillet of butter, brown sugar, and chocolate, baked low and slow under a lid loaded with briquettes. I make this giant skillet cookie whenever I want camp dessert to feel like an event instead of an afterthought. Miam, indeed.
Below you’ll find the gear this recipe actually needs, how I set up the coals so the top and bottom cook evenly, what to watch for so you don’t end up with a burnt bottom and a raw center, and the full recipe card with quantities, timing, and my prep-ahead notes. Jump straight to the recipe if you’re in a hurry, or keep reading for the details that separate a good giant cookie from a great one.
🔥 Why I Always Pack This Giant Skillet Cookie
Most camp desserts are sad — a foil packet of half-melted marshmallow, a store-bought treat squashed at the bottom of a cooler. This one is the opposite. It’s a full dessert cooked entirely in one pan, it feeds a group without anyone having to portion anything, and it comes out of the fire looking like you tried a lot harder than you did. I don’t bring many desserts camping. I bring this one.
🍳 The Gear That Actually Matters
You need a real cast iron skillet, ten to twelve inches across — cast iron holds heat evenly, and this cookie cooks slowly enough that a thin pan will scorch the bottom before the center sets. You also need a lid you can pile briquettes on top of: a camp dutch oven lid works, or a second cast iron skillet set upside down. Beyond that, keep it simple.
- 10 to 12-inch cast iron skillet. The only pan that holds heat evenly enough for this to work.
- A lid for briquettes. A camp dutch oven lid or a second skillet turned upside down.
- Tongs. For moving hot briquettes without burning yourself.
- A fork. For mixing the dough right in the bowl — no mixer needed.
🧈 Ingredients and What You Can Swap
Butter is the backbone here — a full cup, no shortcuts, no swapping in oil. Brown sugar brings the moisture and chew. Water and vanilla loosen the dough just enough to mix, and two eggs bind it all together. Flour, baking soda, and salt give it structure. For the chocolate, use whichever you prefer — dark, milk or white. Chopped chunks melt into bigger, messier pockets than standard chips, though chips work perfectly well if that’s what’s in your pack.
🪵 Building the Coal Setup for a Giant Skillet Cookie
This is where the recipe lives or dies. Preheat your lid separately so it’s already hot when it goes on top of the dough. Cook with four briquettes underneath the skillet and three on the lid, and plan on roughly 20 to 30 minutes total, checking often. The bottom briquettes do steady, even work; the top ones are mostly there to brown the surface, so you need fewer of them.
🍫 Watching the Chocolate, Not the Clock
With a giant skillet cookie, forget the timer as your main guide. Your nose will tell you more than a watch ever will — burnt chocolate has a sharp, bitter smell that’s impossible to miss once you’ve smelled it. If you catch a whiff of that, pull the skillet immediately and check underneath before deciding whether to put it back over the coals.
🎯 Getting Doneness Right
In a giant skillet cookie, a slightly underdone center is not a mistake — it’s the goal. Cast iron holds so much heat that the cookie keeps cooking for a few minutes after you pull it off the fire, and a bottom that looks perfect at the moment you check it is often already headed toward burnt. I’d rather serve a cookie with a soft, barely-set middle than one that’s dry and dark on the bottom. When in doubt, pull it early. Because the center stays soft on purpose and the batter includes eggs, it’s worth knowing the target: FoodSafety.gov’s safe minimum internal temperature chart lists 160°F for egg dishes as the baseline to aim for if you’re ever unsure.
🍨 How I Serve the Giant Skillet Cookie
Straight from the skillet, cut into wedges at the fire, while it’s still warm enough that the chocolate is soft. I like it à la mode, with a scoop of ice cream melting into the cracks, or with a drizzle of heavy cream if that’s what’s on hand. Either way, serve it right there — this isn’t a dessert that travels well to a plate across camp.
🧊 Make It Ahead, Pack It Smart
You have two options for getting ahead of this one. Combine the flour, baking soda, and fleur de sel at home in a small bag or container labeled “giant cookie,” so you’re only mixing wet and dry on the spot. Or go further: make the entire dough at home, roll it in plastic wrap, and refrigerate or freeze it. If you do that, you skip the mixing step entirely at the fire — you go straight to the skillet and the coals.
- Pack the dry mix. Combine flour, baking soda, and fleur de sel at home, labeled and ready to go.
- Make the full dough. Mix everything, wrap it, and refrigerate or freeze until you reach camp.
Giant Skillet Cookie
Equipment
- 1 10 to 12-inch cast iron skillet
- 1 camp lid or second cast iron skillet for holding briquettes on top
- 7 charcoal briquettes 4 underneath, 3 on the lid
Ingredients
For the cookie dough
- 1 cup butter yes, a full cup
- 3/4 cup brown sugar
- 1 tsp water
- 1 tsp vanilla extract
- 2 eggs
- 2 cups all-purpose flour
- 1 tsp baking soda
- 1 tsp fleur de sel
Mix-in
- 1 1/2 cups chocolate chunks dark, milk or white, whichever you prefer
Instructions
Make it ahead
- Combine the flour, baking soda, and fleur de sel in a small bag or container labeled “giant cookie.” Or skip ahead: make the full dough at home, roll it in plastic wrap, and refrigerate or freeze it. If you do this, go straight to the cooking step once you get to the fire.
Cookie dough instructions
- In a large bowl, combine the butter and brown sugar with a fork until you get a medium-thick paste.
- Add the water and vanilla, then mix.
- Add the eggs and mix again, gently.
- Add the flour, baking soda, and salt, mixing just until combined — don’t overwork the dough.
- Gently fold in the chocolate chunks.
- Butter and flour a 10-inch cast iron skillet, or line it with a square of parchment paper.
- Drop the dough into the skillet in one big ball and flatten it slightly with the palm of your hand.
Cook over the briquettes
- Set the skillet in the coals with a preheated lid on top — 4 briquettes underneath and 3 on the lid — and cook for about 10 minutes.
- Give the skillet a quarter turn every 2 to 3 minutes so the heat spreads evenly and you avoid hot spots.
- Keep a close eye on it as it cooks — your nose is the best guide here, since burnt chocolate is easy to smell coming.
- Serve in wedges, ideally à la mode with a scoop of ice cream or a drizzle of heavy cream.
Notes
- Making it without cast iron
- Lighting briquettes without a chimney
- No lid for briquettes
- Using chocolate chips instead
- Fixing a burnt bottom
- Making the dough ahead
- Checking doneness without seeing it
❓ Frequently Asked Questions
Can I make this without cast iron?
Not over a fire, no. Cast iron is what lets this cookie cook slowly and evenly without scorching. At home, a heavy oven-safe skillet works in a pinch, but on the spot, cast iron is the only reliable option.
Do I need a charcoal chimney to get the briquettes going?
It makes things faster and more consistent, but it’s not required. Any bed of hot, glowing coals will work as long as you can control roughly how many go under the pan and on the lid.
What if I don’t have a lid I can put briquettes on?
Tent the skillet loosely with foil instead. You’ll lose some of the top browning, so rotate the pan a little more often to compensate and check the center closely near the end.
Can I use chocolate chips instead of chopping a bar?
Yes. Chips work fine. Chopped bar chocolate just melts into bigger, gooier pockets, which I prefer, but it’s a preference, not a requirement.
Why is my cookie burning on the bottom before the center sets?
That usually means too much heat underneath — either too many coals or coals sitting too close to the pan. Pull a briquette or two from below and rotate the skillet more frequently.
Can I make the dough completely ahead of time?
Yes — that’s exactly what the make-ahead option above is for. Mix, wrap, and refrigerate or freeze the full dough at home, then go straight to cooking once you’re at the fire.
How do I check if it’s done when I can’t see the center?
Look at the edges first — they should be set and starting to pull slightly from the pan. The top should look matte, not wet and shiny. A gentle jiggle in the center is fine; that’s the gooey middle you want.