

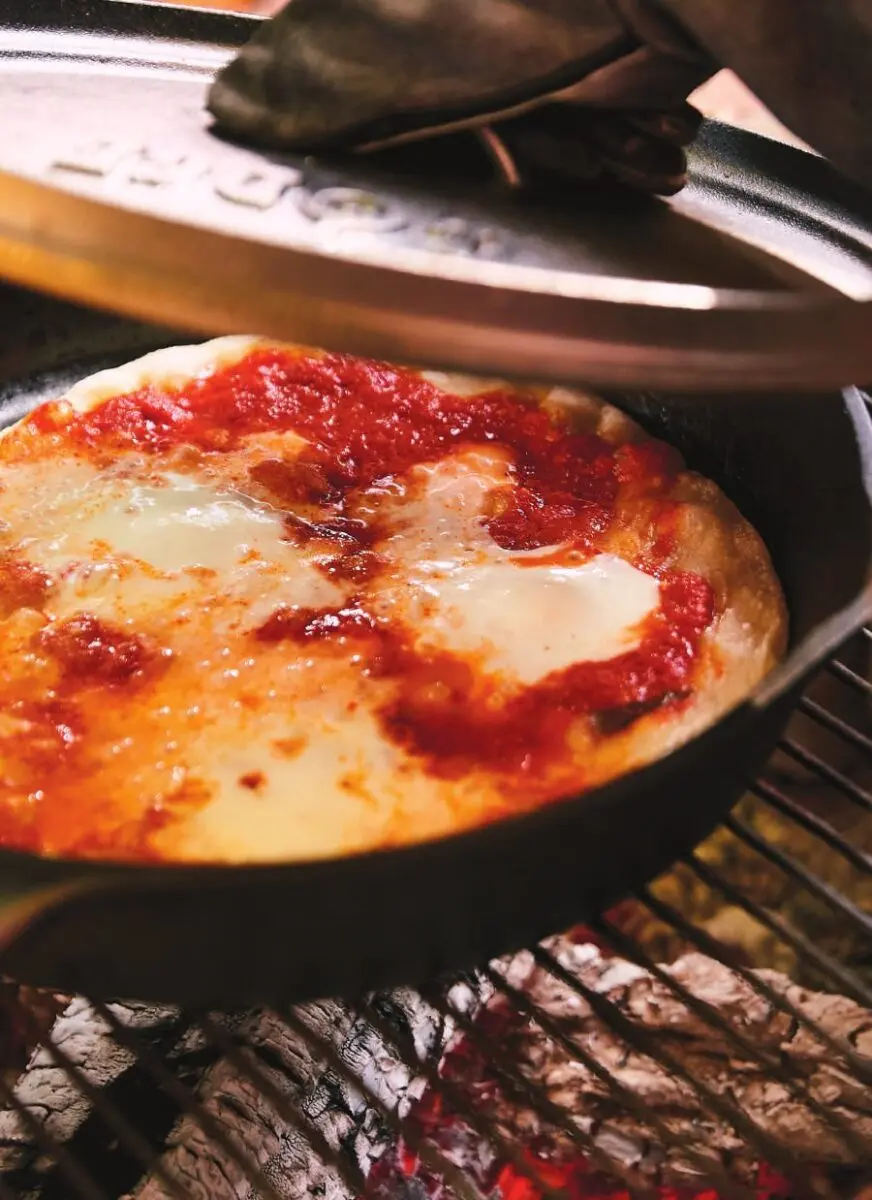
My family is completely obsessed with pizza. Over the years we’ve tried just about everything you can think of to make a proper pie at home: a pizza stone, a perforated pan, straight on the BBQ grate — top rack, bottom rack, every rack. The obsession got so out of hand that we eventually bought an outdoor wood-fired pizza oven, which is now our favorite way to make pizzeria-worthy pies in the backyard. But out on the spot, there’s no contest and no fancy equipment needed: a cast iron pan is my go-to, silver-medal method for pizza in the woods. (And no, you cannot pull this off with a nonstick pan — I’ve tried, and it just doesn’t work the same way.)
Below I’ll walk you through why this cast iron skillet pizza works, what gear you actually need, how to build it so it doesn’t fall apart on you, and two ways to cook it depending on whether you’ve got a camp BBQ or just an open fire. There’s also a proper recipe card at the bottom with exact steps, plus answers to the questions I get asked most about camp pizza.
❤️ Why You’ll Love This Cast Iron Skillet Pizza
- Three ingredients, one pan. Dough, sauce, and whatever toppings you brought along — no shopping list, no fuss.
- Ready faster than delivery. Ten minutes to heat the pan, five to ten more to cook, and you’re eating well within half an hour.
- No oven required. The lid turns your pan or dutch oven into a stand-in oven, right over the coals or the BBQ.
- Works with a camp BBQ or a bare campfire. I’ve written out both methods below, so it doesn’t matter what you’re cooking on.
- A genuinely crisp bottom. Cast iron holds heat the way a pizza stone does, so the crust actually crisps instead of steaming in the pan.
🍕 Why Cast Iron Wins at Camp
A campsite doesn’t have a pizza oven, and it doesn’t have a 500°F home oven either. What it does have is fire, and fire is exactly what cast iron is built for. A well-seasoned cast iron pan (or your dutch oven, lid and all) holds heat the way a pizza stone does — it soaks up the BBQ’s heat for a good ten minutes and then holds onto it, giving the bottom of your dough a real chance to crisp instead of just steaming in place. A thin pan can’t do that, and a nonstick pan definitely can’t — the coating won’t thank you for it either.
The other thing cast iron gives you is a lid. Cover the pan while the pizza cooks and you’ve basically built yourself a little oven — heat circulates around the top and melts the cheese while the bottom crisps against the metal. That’s the whole trick, and it’s why I keep coming back to this method.
🔥 What You’ll Need
This is a short list on purpose — camp pizza should not require a trip to a specialty store.
- A cast iron pan or dutch oven, with its lid. Whatever size you’ve got on the spot; the pizza is sized to fit the pan, not the other way around.
- A camp BBQ, or a bed of coals. Either approach works — I’ve written out both methods below.
- A kitchen torch (optional). Handy for browning the top if you want a gratinéed finish, but not required.
- Tongs and a heatproof glove or two. The pan handle gets seriously hot and stays that way.
🧺 The Dough, the Sauce, and Your Toppings
The ingredient list for this one is deliberately short: a ball of pizza dough, tomato sauce, and toppings of your choice. I keep it that simple on purpose, because on the spot you want a recipe you can adapt to whatever’s left in the cooler, not one that sends you back to town for a missing ingredient.
For the dough, buy a ball from your favorite bakery or bring one you made at home — either is completely fine, and honestly the pan does more of the work here than the dough recipe does. For the sauce, a jar of good tomato sauce from home travels well and needs no fuss. And for toppings, this is where I let people do what they want, with one piece of advice below on which ones to be careful with.
A few topping combinations that hold up well over a fire, if you want a starting point rather than a blank page:
- Classic. Mozzarella, a handful of basil, a drizzle of olive oil once it’s off the heat.
- Pepperoni. Sliced pepperoni and mozzarella — it renders its own fat as it cooks, which only helps.
- Camp veggie. Bell pepper, red onion, and olives — all dry enough to go on raw and sliced thin.
⏱️ How to Cook It, Step by Step
Here’s the short version — full timing is in the recipe card below, but this is the rhythm of it. Get your cast iron pan (or dutch oven) heating in the camp BBQ over high heat for a good ten minutes before you do anything else; it needs that time to get hot all the way through, not just on the surface. While it heats, get every topping prepped and sitting right beside you, because once the dough goes in, everything moves fast.
Stretch or roll your dough into a round the size of the pan’s base, or a touch smaller. Carefully lay it into the hot pan, then work quickly: spread the sauce, scatter the toppings, and get the lid on. Cover and let it cook undisturbed for at least five minutes before you even think about peeking — lifting the lid too early lets out the heat that’s doing the work of melting your cheese and crisping your crust at once. Go light on the sauce too; overdo it and the middle never quite catches up to the edges.
🪵 No BBQ? Cook It Straight on the Campfire
No camp BBQ? Do this whole thing with a dutch oven directly on the fire — it’s just as good. Preheat the dutch oven and its lid right on the grate, or straight in the coals, for at least ten minutes. When it’s ready — carefully, because that pot is now genuinely hot — lay the dough in without pulling the pot off the fire, add sauce and toppings, then cover to recreate that little-oven effect.
Give the pot a quarter turn every minute so it cooks evenly instead of scorching on one side, and check after three to five minutes. If you want a browned, gratinéed top, finish it off with a kitchen torch once it’s off the fire. It’s a touch more hands-on than the BBQ version, but it works anywhere you can build a fire.
🧑🍳 Manon’s Tips for Cast Iron Skillet Pizza
- Give the pan the full ten minutes. Rushing the preheat is the number one reason for a soggy middle — it needs to be hot all the way through, not just on the surface.
- Go lighter on the sauce than feels right. A thin layer is plenty; pile it on and the center never quite catches up to the edges.
- Add wet cheese at the very end, not the start. Fresh mozzarella packed in water sheds moisture the whole time it cooks; save it for the last minute instead.
- If you’re on coals instead of a BBQ, keep turning. A quarter turn every minute on the dutch oven is the only thing standing between an evenly cooked crust and one that’s scorched on one side.
- Respect the heat. A handle straight off the coals will burn you before you feel it coming — keep a glove within reach. The National Park Service’s campfire safety guide is worth a read before your first trip.
🍽️ How to Serve It
Let the pizza rest in the pan a minute or two before you try to get it out — the cheese needs a moment to set, or your first slice slides right off. Slide it onto a cutting board, cut it into wedges, and serve it right away while the bottom is still at its crispest. This isn’t a pizza that reheats into its former glory, so I plan for everyone to be sitting around the fire, plates in hand, when it comes off.
🧊 Leftovers
If you do end up with extra slices, wrap them and keep them cool — a cooler with ice works fine for a day. Reheat them back in the cast iron pan over low heat with the lid on, which brings back some of the crispness that a cold slice loses. It won’t be quite as good as fresh off the fire, but it’s still a solid breakfast the next morning.
🔄 Variations and Swaps
- No tomato sauce on hand? A thin layer of pesto or barbecue sauce works just as well under the cheese — keep it light either way.
- Going vegetarian? Stick to the dry toppings — peppers, onions, olives, pre-cooked mushrooms — and you’ve got a full pie with zero extra work.
- No dough ball around? A round of naan or a thick pita makes a smaller, faster stand-in — just watch it closely, since it cooks quicker than a full dough ball.
Cast Iron Skillet Pizza
Equipment
- 1 cast iron pan or dutch oven, with lid
- 1 Kitchen Torch optional, for a browned top
Ingredients
The base
- 1 pizza dough ball store-bought from a bakery, or homemade
- tomato sauce your favorite, used sparingly
Toppings
- toppings of your choice see suggestions in the notes below
Instructions
Get set up
- Get all your toppings prepped and within reach. Once the dough hits the pan you will be moving fast.
- Roll or stretch the dough into a round about the size of the base of your pan, or a touch smaller.
In the camp BBQ
- Preheat your cast iron pan (or dutch oven) with its lid over high heat for at least 10 minutes.
- Lay the dough in, spread the tomato sauce, scatter the toppings.
- Cover and cook for at least 5 minutes before lifting the lid to check.
Straight on the campfire
- Preheat a dutch oven and its lid on the grill grate, or bury them right in the coals, for at least 10 minutes.
- Leave the pot on the fire and lower the dough in — mind your knuckles. Sauce, toppings, lid on: you have just built yourself an oven.
- Quarter turn every minute. At 3 to 5 minutes, lift the lid and see whether the crust is cooked through.
- Want it gratinéed? Finish the top with a kitchen torch.
Notes
- Using a nonstick skillet instead of cast iron
- Whether you really need the lid
- How to know when the pizza is done
- Making it without a BBQ, on an open fire
- Best toppings for camp pizza
- Using store-bought dough
- Why the crust came out soggy in the middle
- Whether to oil the pan before adding the dough
- Making it in a regular oven at home
❓ Frequently Asked Questions
Can I use a regular nonstick skillet instead of cast iron?
No. Nonstick pans aren’t built for the sustained high heat this method needs, and you’ll lose the crisp bottom that makes the whole thing worth doing. Cast iron or a dutch oven is the way to go.
Do I really need the lid?
Yes. The lid is what turns your pan into a little oven, trapping heat so the top of the pizza cooks at the same time as the bottom. Skip it and you’ll end up with a raw top and a burnt bottom.
How do I know when the pizza is done?
Check after five minutes covered: the cheese should be melted, the edges of the crust should look set and lightly golden, and the dough shouldn’t look wet or translucent underneath when you lift an edge with tongs. If it needs more time, cover and keep going in short bursts.
Can I make this without a BBQ, right on an open fire?
Yes — use a dutch oven instead of an open pan, preheat it on the grate or in the coals, and turn it a quarter turn every minute so it cooks evenly. It’s described step by step above.
What toppings work best for camp pizza?
Anything dry works well — cured meats, thinly sliced vegetables, olives, cheese. Go easy on or pre-cook watery ingredients like fresh tomato, mushrooms, or fennel so they don’t turn your crust soggy.
Can I use store-bought dough?
Absolutely. A ball of dough from your bakery is exactly what I bring most of the time — it’s one less thing to manage on the spot, and the pan does the heavy lifting anyway.
My crust came out soggy in the middle. What went wrong?
Almost always too much sauce, too many wet toppings, or a pan that wasn’t hot enough to begin with. Go lighter on the sauce, dry off any wet toppings, and make sure you give the pan its full ten minutes to preheat before the dough goes in.
Do I need to oil the pan before adding the dough?
Not if your cast iron is well seasoned — the dough won’t stick to a properly seasoned surface. If you’re not confident in the seasoning yet, a thin wipe of oil before the dough goes in is cheap insurance.
Can I make this in a regular oven if I’m not camping?
Yes — heat your cast iron pan in a 500°F home oven for the same ten minutes, then cook the pizza on the stovetop or back in the oven with the lid on, checking at the same five-minute mark. It won’t taste quite like it does over the fire, but it’s a solid backup on a night you’re not camping.